Team:MADRID UCM/Hardware

Hardware 1 – iGem Madrid

Brook Preloader
Wave Wave

HARDWARE

Our hardware is divided into two different aspects. First, the part able to detect microorganisms in the water - in our case, the bacteria responsible for cholera disease. Second, the hardware focused on modules for the Opentrons.
This page is divided in those both sections and was made specifically to apply to answer the questions of the prize. If you want to expand the information don't hesitate to dive further in our wiki.

1 Potentiostat

Our goal was to create a small, low-cost (<40$) and user-friendly potentiostat to detect cholera in developing countries in areas with limited infrastructure. With this in mind, we aimed to make it as simple as possible, to make it easier to use and keep the cost low.

We needed to make a device with which we could detect differences in potential. This does exist already, so we analysed the functionality and the way some of the existing open-source potentiostats were created.

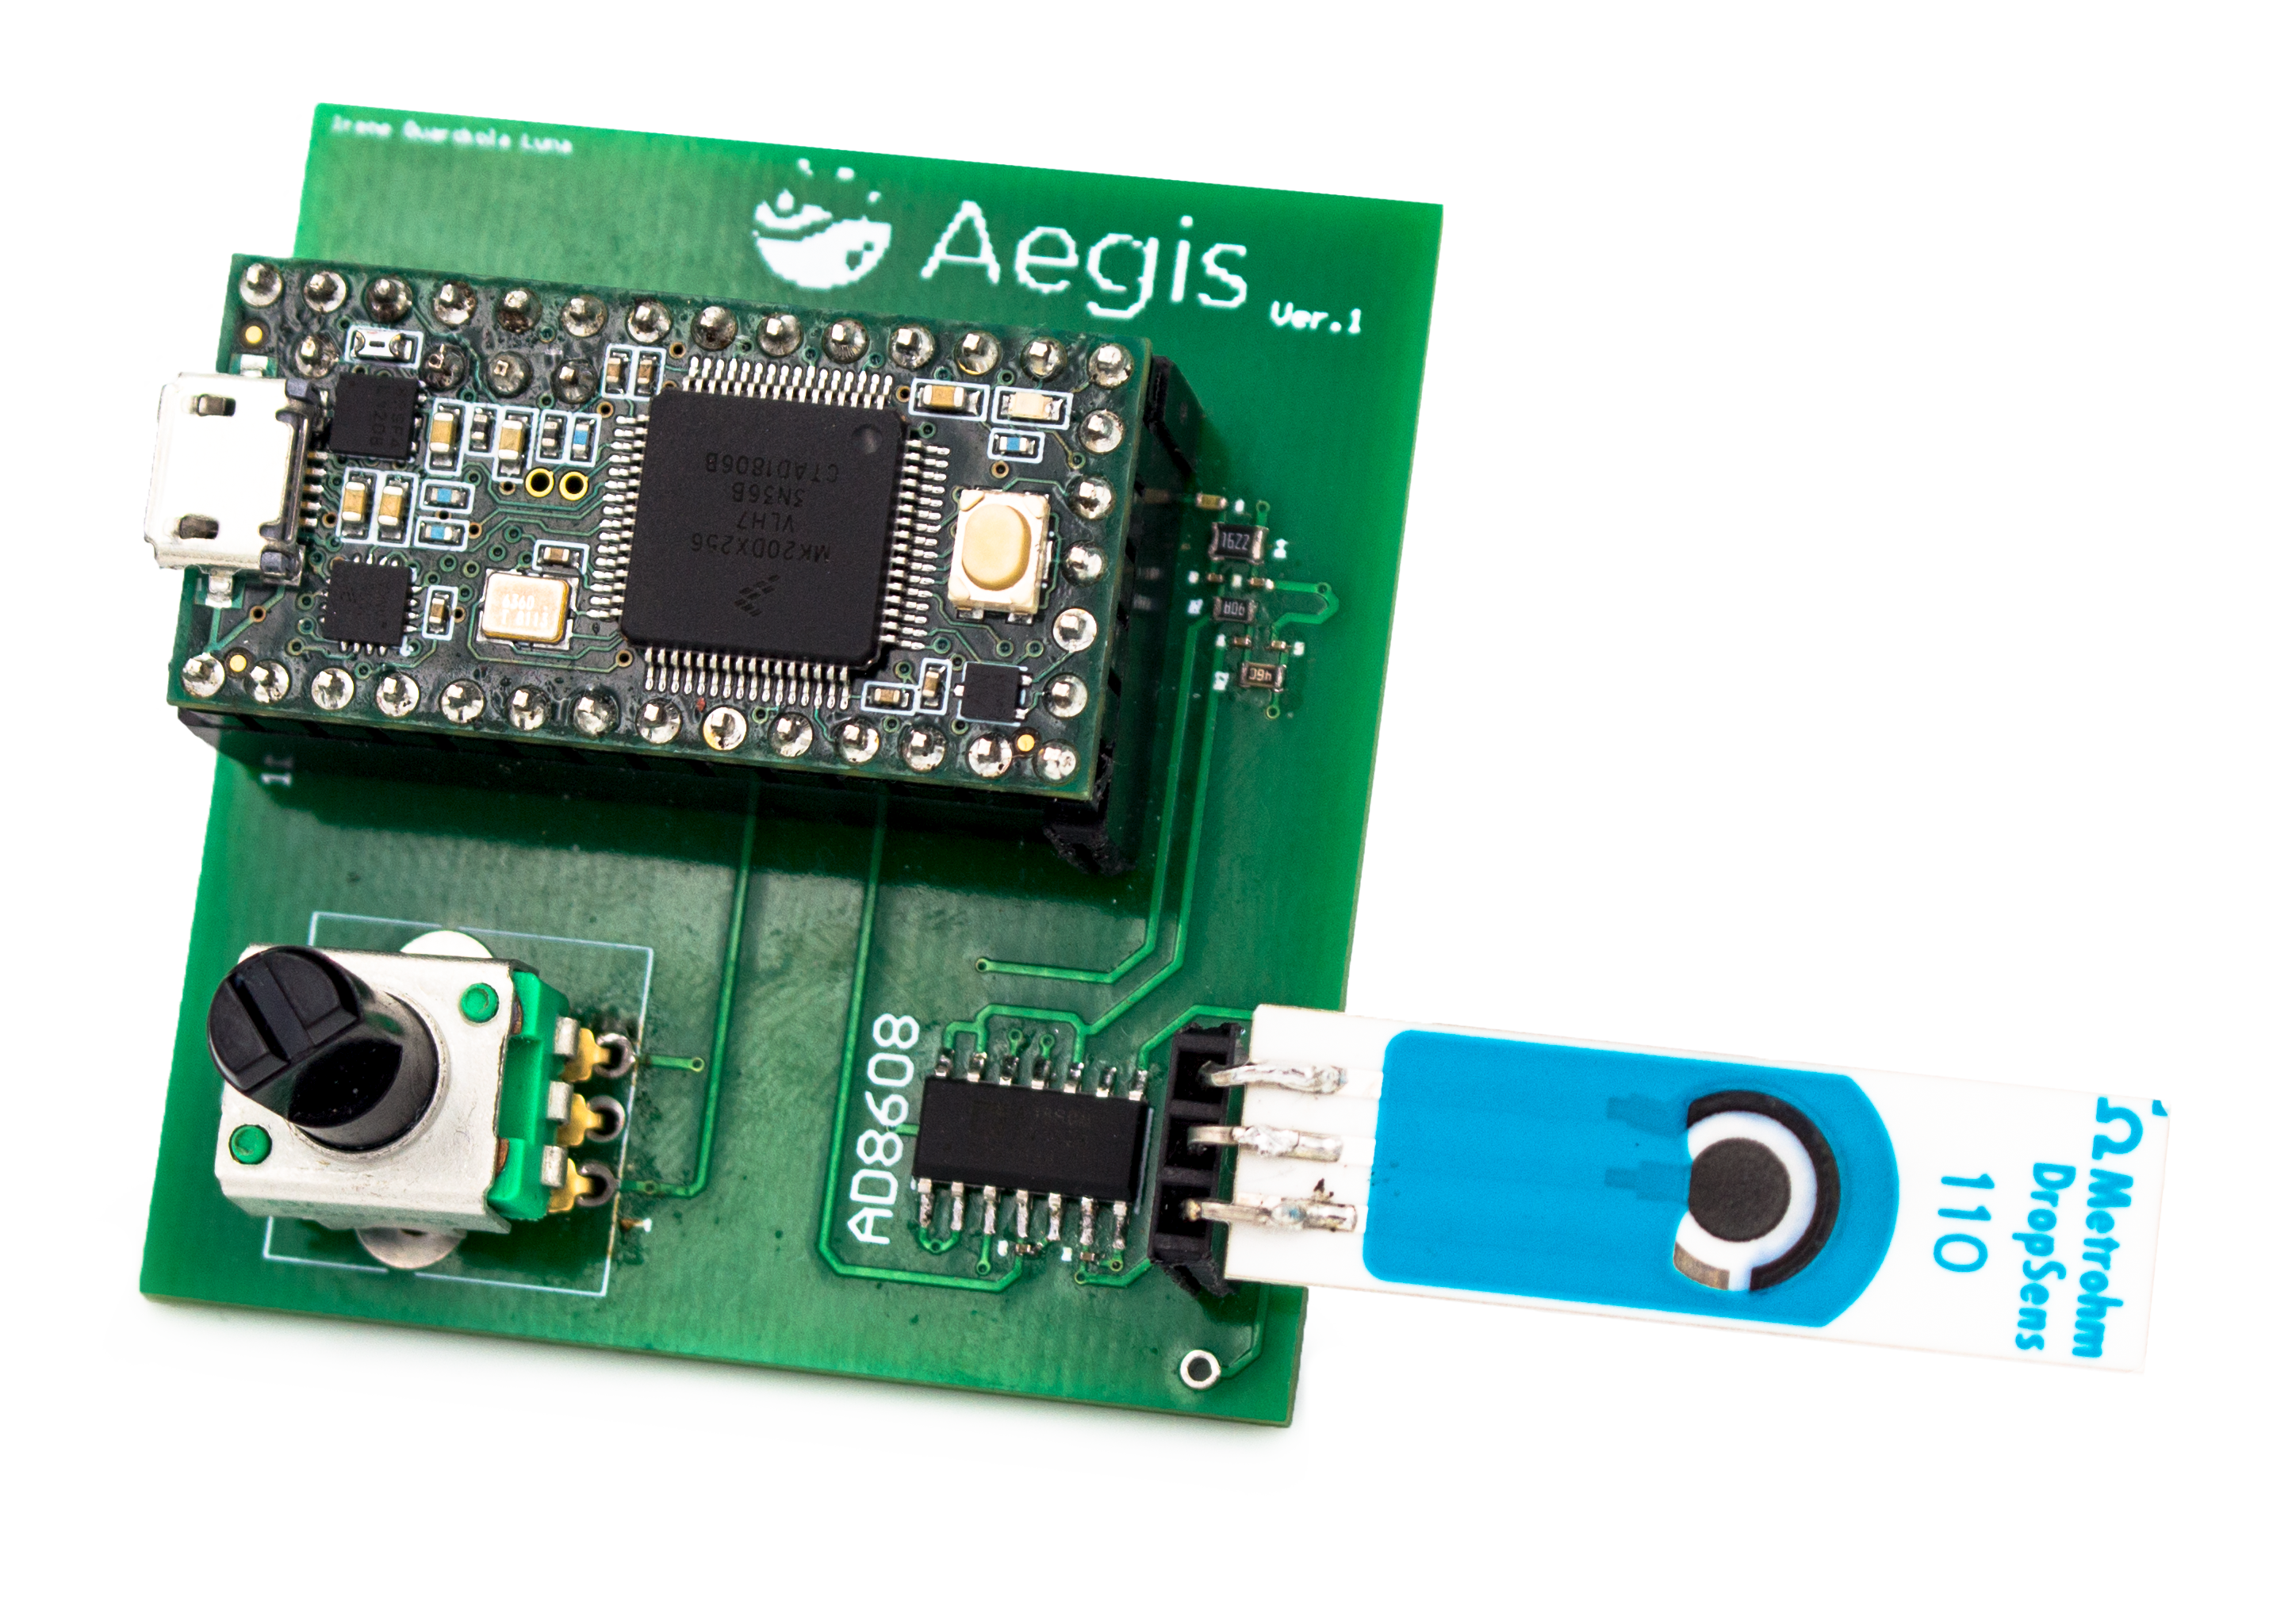
Since the device is for areas with limited access to technology, we have constructed our potentiostat in such a way that if it stops working the most probable reason is the breakdown of the Teensy, which is not directly soldered onto the PCB and so is easy to change.

Our design has been inspired and based mainly on two different open-source potentiostats [1], [2]. Our device is designed to be used next to a computer connecting to it through a USB port.

The potentiostat works this way: the Teensy 3.2, through the DAC pin, gives us a variable input voltage from 0 to 2V. Said voltage goes through the Sallen-Key filter and later on through an operational amplifier, which is connected to the electrode, and the electrode connects to the transimpedance operational amplifier, whose output value is entered into the Teensy by the ADC pin.

potentiostato
The Teensy 3.2 is a complete USB-based microcontroller development system [3]. The reason to use this is the high resolution of the ADC and DAC pins, the communication through USB and the ability to programme it with the open-source Arduino software.

We use the DAC pin to convert a digital value to an analogic one and use it as the input for the filter.

The Sallen-Key filter is used to decrease the noise. We used the same low pass filter referenced in [2].

As said in [4], with the operational amplifier connected to the electrode, we manage to keep the potential of the working electrode constant with respect to the potential of the reference electrode by adjusting the current in the counter electrode.

With the transimpedance amplifier, we are able to convert the current obtained in the working electrode to voltage and input the value into the ADC pin of the Teensy.

Our first version differed from the last one in that it had a potentiometer in the transimpedance amplifier. With this potentiometer we could change the resistor value of the transimpedance amplifier and study the changes it produces in our results. Since the rest worked well, we only changed the potentiometer for a resistor on our final design.

placa+azul
In the end, we created a potentiostat with an operating range of ±1.5V and a range of currents of ±100μA, due to the 5KΩ resistor used in the transimpedance amplifier.

It allows voltammetric measurements, which include cyclic voltammetry and square wave voltammetry.

Finally, we conducted an experiment with ferricenida and got the expected results, comparing them with those obtained last year by the iGEM team Madrid-OLM.

github-image-796x418

GITHUB

You can check all the Potentiostat documentation in our GitHub repository.
Go!

Future Plans

For future designs, we could change the Teensy 3.2 for the necessary independent components and thus lower the price and the size further.

Special Prize

Does the Hardware address a need or problem in synthetic biology?
Our Hardware address the need of a small, low-cost potentiostat to detect microorganism in the water, in our case, the bacteria responsible for cholera disease. To sum up, we have designed a scalable and standardized detection tool, in which just changing the electrode we could detect other diseases.
Did the team conduct user testing and learn from user feedback?
We have developed a potentiostat because it has the necessary characteristics defined by our human practiced research. In addition, we have reached a collaboration agreement with the iGEM team NAWI Graz to exchange our hardware. They also gave us recommendations regarding to our hardware.
Did the team demonstrate utility and functionality in their hardware proof of concept?
We successfully conducted experimentation to prove the proper function of the device. Also, we have based on the work developed on the past year. Last year it was found that this technology and the square wave voltammetry method worked correctly obtaining good results, so when developing our potentiostat we have compared the results to know if they are correct, and indeed they are.
Is the documentation of the hardware system sufficient to enable reproduction by other teams?
We have provided all necessary information related to the assembly of the modules, from the gerber files, the bill of materials, the schematics and the case on GitHub. With all this, any team would be able to replicate our modules obtaining exceptional results.
References
[1] Rowe, A., Bonham, A., White, R., Zimmer, M., Yadgar, R., Hobza, T., Honea, J., Ben-Yaacov, I. ad Plaxco, K. (2011). “CheapStat: An Open-Source, “Do-It-Yourself” Potentiostat for Analytical and Educational Applications”. PLoS ONE, [online] 6(9), p.e23783.
[2] Ainla, A., Mousavi, M., Tsaloglou, M., Redston, J., Bell, J., Fernández-Abedul, M. and Whitesides, G. (2018). “Open-Source Potentiostat for Wireless Electrochemical Detection with Smartphones”. Analytical Chemistry, [online] 90(10), pp.6240-6246.
[3] Pjrc.com. (2019). PJRC Store. Available at: https://www.pjrc.com/store/teensy32.html
[4]D. Skoog, J. Holler and T. Nieman, Solutions manual to accompany Principles of instrumental analysis. Philadelphia: Saunders College Publ., 1998.
[5]M. Toriningen Inc.(Shingo Hisakawa, "NinjaPCR", NinjaPCR, 2019. Available: https://ninjapcr.tori.st/en/index.html.
[6] M. Dryden and A. Wheeler, "DStat: A Versatile, Open-Source Potentiostat for Electroanalysis and Integration", PLOS ONE, vol. 10, no. 10, p. e0140349, 2015.

2 Opentrons Modules

Fluorimeter

Since we are automating the entire SELEX process, we decided to add a fluorimeter to the Opentrons, which we created ourselves.
Our fluorimeter was designed to be controlled and powered with a micro-USB connection, providing power and data transference. Because it uses the ESP12E chip, it can be programmed with the open-source Arduino software.

The fluorimeter consists mainly of 4 LEDs of different wavelengths, 2 optical filters, 4 photodetectors and a microcontroller.

The wavelengths of the LEDs are: 405nm, 473nm, 532nm and 600nm.

The optical filters are bandpass and we used them to filter the wavelengths of the second and third LED. The wavelengths of the filters are: 532nm and 568nm.

logo_linea_negro

Robo SELEX

If you want to learn about the role of this module in the project, continue to the Robo SELEX webpage.
Go!
The fluorimeter works so that, when an LED is turned on, it emits light, which the sample subsequently absorbs and emits at a longer wavelength. Afterwards, an optical filter is placed at a longer wavelength than the LED. The signal received by the photodetector is input to the ADC of the microcontroller.

With this design, LEDs can only work one by one.

github-image-796x418

GITHUB

You can check all the Fluorimeter documentation in our GitHub repository.
Go!
image52-removebg-preview

Future Plans

For future designs, an important improvement may be to change the single-measurement system to a multiple-measurement one, where tests can be run in fours.

Shaker Module

To automatize the SELEX and ELONA process, we created a shaker module and adapted it to the Opentrons to maintain the plate shaking during a certain period.

We could achieve this using a stepper motor controlled with a driver, with which we could input pulses. We also included magnets and Hall sensors to know exactly where the plate is in the movement, and hence know that when you pass once through the three magnets, that is your point of origin and end.

To program it we use the open-source Arduino software and a driver to switch from USB to UART.

logo_linea_negro

ELONA

If you want to learn about the role of this module in the project, continue to the aptamer characterization webpage.
Go!
github-image-796x418

GITHUB

You can check all the Shaker documentation in our GitHub repository.
Go!
logo_linea_negro

Robo SELEX

If you want to learn about the role of this module in the project, continue to the Robo SELEX webpage.
Go!
foto 4

Future Plans

For future designs, we could exchange the plate holder for one with resistors to get the temperature to 40ºC during the incubation.

Wax Module

To print microfluidic channels on a membrane in different experiments, and thus delimit the path that follows the water and at the same time make this process automatic and replicable, we decided to create a wax module. With this module we can heat an aluminium plate with two resistors controlled with a PID (Proportional Integral Derivative) and a PT100 sensor, in order to maintain a certain temperature.

Analogue of the Shaker Module, this can also be programmed with the Arduino software and a driver.

foto 3
ezgif-1-874094770d6f
github-image-796x418

GITHUB

You can check all the wax module documentation in our GitHub repository.
Go!
github-image-796x418

GITHUB

You can check all the paper microfluidics documentation in our GitHub repository.
Go!
With this module, along with the stamps printed with the 3D printer adapted for the Opentrons, we managed to automatize this whole process.

PCR and Thermal Modules

Just as we wanted with the SELEX process, we also wanted to automatize the flourimeter,, so we decided to add a thermocycler to the Opentrons. For this we bought an open PCR named NinjaPCR [5] and duplicated the PCB to have two thermal modules - one to maintain 4ºC and the other one for 40ºC and 94 ºC.
To maintain those temperatures, we used peltier cells controlled with a PID controller.
termociclador
modulo termico
github-image-796x418

GITHUB

You can check all the thermoclycler documentation in our GitHub repository.
Go!
github-image-796x418

GITHUB

You can check all the thermal module documentation in our GitHub repository.
Go!
We wanted to avoid human interference in the SELEX process, so instead of having to open the lid of the PCR manually, we automatized it by adding a servomotor, controlled through the ESP12E located at the PCB. We are able to send through the TX pin a number of degrees to open or close the lid and apply pressure on the PCR tubes.

The servomotor is connected to a 5V power supply and to the TX pin of the PCB.
Once we had the motor, we made a scaffold with a 3D printer.

Analogue to the previous modules, this can also be programmed with the Arduino software and a driver.

Future Plans

For future designs, we could change the metal block for one a little bigger, without resizing the actual case.

Special Prize

Does the Hardware address a need or problem in synthetic biology?
We adress the problem of replicability in biology, adapting an affordable robot to automatize the central protocol of our technology (The SELEX protocol). For addressing that we create a series of DIY electronic modules that allowed us to robotize the protocols without expending so muich money in brand new ones. This modules are not only exclusive for SELEX but the design files could be used by future teams toreplicate them to automatize their own laboratory protocols.
Did the team conduct user testing and learn from user feedback?
The thermal modules and the PCR were tested beforehand by the creators of NinjaPCR. The other modules were tested by ourselves and we received feedback from other labmates.
Did the team demonstrate utility and functionality in their hardware proof of concept?
With the Opentrons modules, we successfully automatized all processes, obtaining outstanding results. When the Opentrons is running, it has no problem accessing each module and interacting with it.
Is the documentation of the hardware system sufficient to enable reproduction by other teams?
We have provided all necessary information related to the assembly of the modules, including the gerber files, the bill of materials, the schematics and the cases on GitHub. With all this, any team would be able to replicate our modules and obtain exceptional results.
References
[1] Rowe, A., Bonham, A., White, R., Zimmer, M., Yadgar, R., Hobza, T., Honea, J., Ben-Yaacov, I. ad Plaxco, K. (2011). “CheapStat: An Open-Source, “Do-It-Yourself” Potentiostat for Analytical and Educational Applications”. PLoS ONE, [online] 6(9), p.e23783.
[2] Ainla, A., Mousavi, M., Tsaloglou, M., Redston, J., Bell, J., Fernández-Abedul, M. and Whitesides, G. (2018). “Open-Source Potentiostat for Wireless Electrochemical Detection with Smartphones”. Analytical Chemistry, [online] 90(10), pp.6240-6246.
[3] Pjrc.com. (2019). PJRC Store. Available at: https://www.pjrc.com/store/teensy32.html
[4]D. Skoog, J. Holler and T. Nieman, Solutions manual to accompany Principles of instrumental analysis. Philadelphia: Saunders College Publ., 1998.
[5]M. Toriningen Inc.(Shingo Hisakawa, "NinjaPCR", NinjaPCR, 2019. Available: https://ninjapcr.tori.st/en/index.html.
[6] M. Dryden and A. Wheeler, "DStat: A Versatile, Open-Source Potentiostat for Electroanalysis and Integration", PLOS ONE, vol. 10, no. 10, p. e0140349, 2015.