Team:KUAS Korea/Experiments
Experiments
For the development of tattoo, which can identify a cortisol concentration of blood, the goal of our project, the Wet Lab study first focused on visualization methods. So first we focused on securing the genes to build the bioluminescence system. Our system needs 8 genes, 4 genes are the key genes that make up the bioluminescence cycle, and the other 4 genes are those that are involved in the supply of materials and the activation of the cycle. We conducted the experiment first with the aim of acquiring the key elements of the cycle, the luciferase and hispidin 3-hydroxylase(hereinafter H3H) genes and verifying their activity. The process has progressed significantly over time to: the preparation of experimental resources, DNA cloning, and protein level analysis.
Preparation
Competent cell preparation
In order to gain genes through cloning, competent cells are needed first. We made competent cells that can change shape by heat shock and used them for all subsequent processes. We will experiment using Escherichia coli, and the strains used are largely three types; DH10B, BL21(DE3)-star, C43(DE3). DH10B is strains to be used for cloning because of their good transformation efficiency, while the other two strains are to be used for gene expression and protein analysis due to their high protein expression. The DH10B strain was tested for its transformation efficiency by transforming pB plasmid vector.
Vector DNA preparation
Cloning requires a vector to carry genes to the host. We used plasmid vectors because we are going to clone it with E. coli, and we will assemble genes in a way called LIC(Ligation Independent Cloning). Therefore, we decided to use a plasmid called pB vector, which has no MCS and has only one SmaI restriction site(5'-CCCGGG-3'). SmaI makes blunt ended product and these features are suitable for LIC. The pB vector results in protein fusion after cloning, with seven different types of pB vectors depending on the tag sequence. The presence of tags can be used for affinity chromatography in protein purification, and the tags can be removed later, for example, by treating the TEV protease. The pB vector also has the ampicillin resistance gene, which can be used to screen the transgenic strains.
Each pB vector can be introduced in competent cells as a heat shock method, cultured enough, and plasmid can be obtained by minipreparation method. To check whether a restriction site, the most important part of the pB vector is preserved, the extracted plasmid was treated with the SmaI restriction enzyme and then the single band appeared as an electrophoresis.
DNA work
PCR
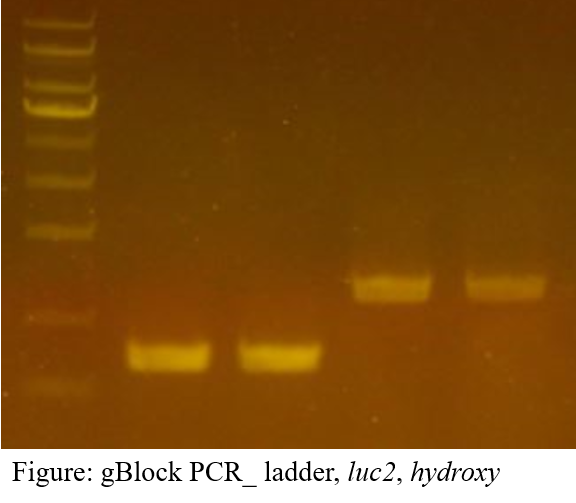
The first gBlock we ordered through IDT is what we call luc2 and hydroxy, each with the fungal luciferase and H3H genes. Two primers(forward, reverse) are designed for each gBlock. Primers are designed to protrude beyond the end of the gBlock, where the protrusion is designed complement to the part of the plasmid vector restriction site for cloning. PCR was performed using primer, gBlock, and pfu polymerase, and the amplified product was checked with electrophoresis.
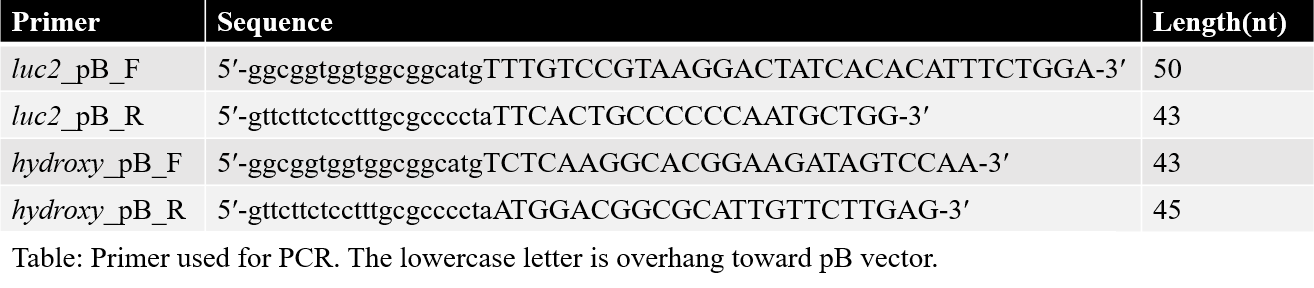
The electrophoresis result showed the band at the desired length(Luc2: 747bp, hydroxy: 1261bp)
Vector linearization with registration enzyme
For LIC, you must first cut the plasmid vector with the restricton enzyme. We cut pB vectors of each type with the SmaI restriction enzyme and verified that they are cut with electrophoresis.

The electrophoresis result confirmed one band in all.
DNA cleanup
When assembling DNA, the ratio and purity of two DNAs are important. To make samples without impurities as much as possible, purify the restriction enzyme-treated plasmid and gBlock amplified with PCR.
Assembly
T4 DNA polymerase was used for DNA assembly. When PCR products, linearized vectors, and T4 DNA polymerase are mixed without dNTP, only 3'→5' exonuclease activity of the pol. is activated, making the end of each component sticky and can assembled each other. Performing this method, the time to treat T4 DNA pol. is important and it is useful because carried out successfully, self-assembly can be reduced. Assembled DNA will be transformed into host cells without the treatment of ligase, and ligation depends on the DNA repair technique and cloning process of host cells. We used the LIC method to assemble the luc2 and hydroxy genes into the pB vector.
Transformation
The recombinant DNA was then transformed into the DH10B strain and then spread on a medium with ampicillin added. Since DH10B does not have its own ampicillin resistant gene, subsequent colony is almost likely to be recombinant strains.
Colony PCR
Since bacterial cells with only vectors-without gBlock assembled-can survive against antibiotics, arbitrary colonies should be selected to confirm the presence of insertion. Colony PCR is a method of breaking cells after growing colonies and amplifying the desired sequence of pieces with PCR. If the primer which is the same thing as gBlock PCR is used at this time, PCR products will be produced only when the desired gene is inserted. By electrophoresis, you can screen out the desired recombinant strains.

Only the desired colonies can be screened by checking whether the band exists on the predicted size.
Minipreparation
By cultivating selected colonies and extracting plasmids, we can obtain recombinant plasmids.
Other genes
In addition to Luc2 and hydroxy, we are continuously carrying out cloning genes such as nnluz, nnh3h, and cph. This text will mainly explain the luc2 and hydroxy genes but cloning of the rest is also essential to complete our bioluminescence cycle. As of October 2019, cloning of the nnluz, nnh3h genes has also been completed. The two genes encode luciferase and H3H, respectively, derived from a fungus called Neonothopanus nambi(‘nn’ means N.nambi).
Protein work
Expression test
Once a gene has been acquired, it needs to be checked if the gene actually expresses the protein with the expected activity. The steps of activity verification are divided into three categories: expression test, solubility test, and activity test in chronological order. Among them, an expression test is a way to determine if the desired gene is expressing protein. It is necessary to perform SDS-PAGE analysis for the cells which are over-expressed the desired genes with the control group, a normal expressing group. The amount of all protein in the cell is checked by electrophoresis. If you check for unusual bands compared to controls and they are the same size as the ones you want to encode, you may say that the genes present proteins.
Solubility test
Just because proteins are expressed, it doesn’t mean that they are always active. For having a normal function, they should exist in an active form. For example, there are many cases of over-expression failure by IPTG processing, since the protein does not form a normal structure and may become tangled together to form a aggregates. These insoluble particles are not of the desired type because they do not have normal activity or function. Therefore, it is necessary to verify that the proteins exist in an active form. When analyzing all proteins in a cell, this can be available by centrifuging the total homogenate to separate with soluble and insoluble parts, and then SDS-PAGE them together. If over-expressed bands are identified in the lane of the soluble part, it suggests that the protein was expressed in its normal(soluble) form.
Activity test
Since we have confirmed that proteins exist in soluble form, we have decided to examine each gene's activity using the luc2-pB4 and hydroxy-pB4 plasmid recombinant strains. The ideal test for gene activation is to purify proteins and perform quantitatively, but you can quickly conduct an active verification test before purifying them. If the active verification fails, the time and effort wasted is large, so if the activity is confirmed in simple way, then proceed with purification and start quantitative analysis. This simple test means just using of unpurified cell fractures(crude extract). However, we have confirmed that protein exists in a soluble state, so we decided to crush cells and centrifugate them to verify their activity using only the supernatant.
So how do we identify the activity of the proteins? For luc2 gene, we should focus on the feature, luminescence. We need to determine if luminescence is observed by adding the substrate of luciferase into the supernatant. The measurement of luminous intensity is possible by using a luminometer. But the problem was the active identification of the hydroxy gene. The only known function of this gene is that it acts as a catalyst for the synthesis of luciferin. Determining whether it produce fungal luciferin, 3-hydroxyhispidin, would be a way of verifying the activity of the hydroxy gene. But we couldn't use this method because this process requires high-level chemical techniques such as NMR. So, we decided to use the alternative method of identifying the two genes at once. The hydroxy gene hydroxylates hispidin under the presence of NADPH. And the resulting substance, 3-hydroxyhyspidin, becomes the substrate of fungal luciferase, that is, luciferin. Thus, it is known that a combination of hispidin, NADPH, H3H, and luciferase can be expected to produce luminescence through two steps of biochemical reactions. Although this solution was difficult to troubleshoot when failed to check activity, we conducted an active verification experiment with this idea because it was worth a try in our situation.
There are 4 major substances involved in this test; hispidin, NADPH, H3H crude extract, and luciferase crude extract. We cannot expect luminescence if even only one of any of these factors are omitted. Therefore, at least 4 control groups are required by excluding one of each element. Moreover, the luminometer should be aware of the background noise for the mixture we measure, since it tells us the relative value(RLU; Relative Light Unit) of the current output by the measured luminescence. Therefore, the luminous intensity of 6 objects is measured. We transformed each gene into 2 strains, BL21(DE3)-star and C43(DE3). Of these, only the culture of BL21(DE3)-star was tested for solubility, but we decided to conduct an experiment with both cases. The table below shows the composition of each target. Omphalotus japonicus is a species of luminous mushroom that acts as a positive control group to verify that hispidin works normally as a precursor to luminescence.
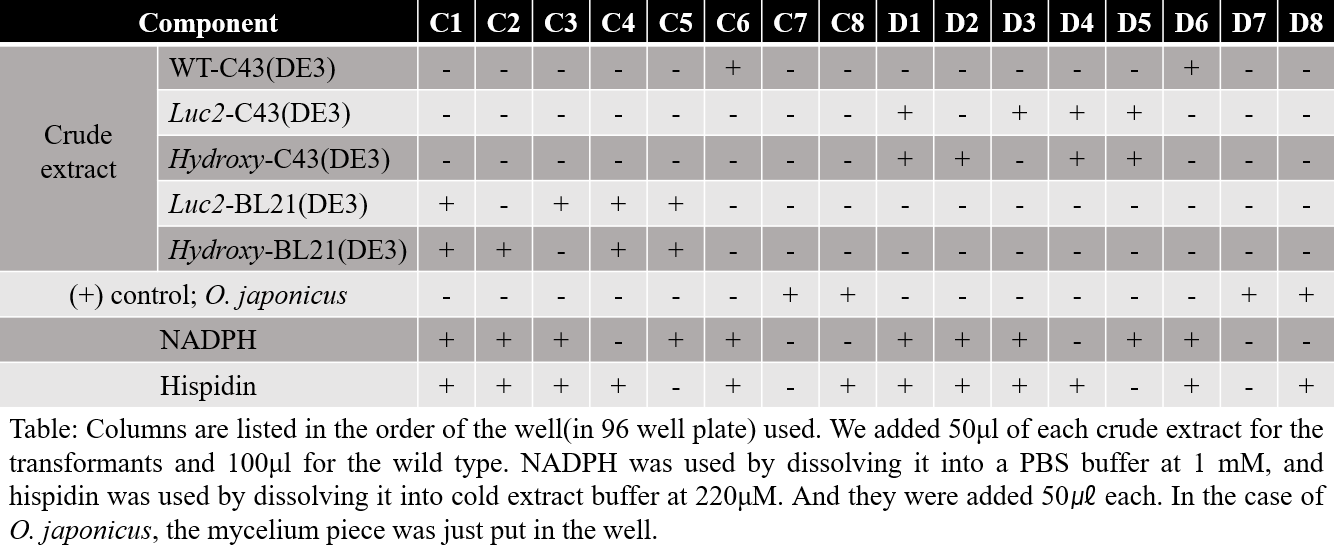
The results of the experiment showed luminescence only in the experimental group that added all components. In order to ascertain specifically the variation in luminous flux over time, we conducted an additional experiment to observe the variation in luminous flux for 12 hours. Now we will enter the stage of obtaining pure luciferase and H3H through protein purification and identifying the specific characteristics of enzymes through quantitative analysis.
Other genes
Since then, we have continued to conduct cloning and verifying protein activity on other genes. Currently, the nnluz and nnh3h genes are being tested for expression.
Protocols
Competent Cell Preparation (for Heat Shock Method)
Materials
Calcium chloride dihydrate sol.(1M), LB media, properly selected marker(antibiotics), centrifuge, Sorvall tube, micropipette
Method
1. Spread the microbial strains on the LB-agar plate and incubate them at the appropriate temperature.
2. Pick a suitable cluster from 2 and perform a small shaking incubation in the LB-marker media.
3. Apply the culture of 2 to the LB-agar-marker plate and incubate at the appropriate temperature.
4. Pick a suitable colony from 3 and perform a shaking incubation at the LB-marker media.
5. Check the OD600 value frequently. When OD600=0.4~0.5 is reached, stop the incubation.
6. Put the culture fluid in a sterilized and frozen tube and centrifugate 20min at 4°C, 4000g.
7. Remove the supernatant solution, add a suitable amount of calcium chloride to the pallet, and mix it gently.
8. Wait for at least 30 minutes in the condition of 7, and then perform centrifugation again as provided in 6.
9. Remove the supernatant and pour the calcium chloride into the pallet in an appropriate amount (0.1 M calcium chloride 2 ml per 50 ml of original culture) and mix it gently.
10. Use immediately for transformation or mix glycerol and store at -70°C.
Transformation
Materials
competent cell, DNA, Eppendorf tube, LB media, micropipette
Method
1. Put a suitable amount of competent cell in a tube.
2. Add DNA (less than 50 ng per 10μl of competent cell) to 1 and ice it for 30 minutes.
3. Heat the tube in a 42°C water bath for about 1 minute. Do not shake at this time.
4. Add 800μl of LB media to the tube and culture with shaking incubation at the appropriate temperature for at least 1 hour.
5. Spread a culture of 4 to the LB-agar-marker plate (if present) and incubate it at an appropriate temperature.
Agarose Gel Electrophoresis for DNA
Materials
agarose, TAE buffer, DNA loading buffer, mold, DNA, ladder (marker DNA fragment), electrophoresis kit, power supply, micropipette
Method
1. Mix agarose in a TAE buffer solution at the desired percentage, heat it, and dissolve it.
2. Pour 1 into a mold and stick the comb in and harden.
3. Put the hardened gel in the kit and fill it with buffer.
5. Mix sample DNA in the loading buffer (about 0.8x).
6. Load ladder and 5 into each well.
7. Apply a suitable voltage (100~150V) for 10~20 minutes.
8. Examine the gel for UV rays and observe the results.
Minipreparation (Using MG MED Kit)
Materials
culture, buffers (S1, S2, S3, AW, PW, EB), centrifuge, column, Eppendorf tube, micropipette
Method
1. Centrifugate the microbial culture at 4000g for 20min.
2. Remove the supernatant completely and add S1 buffer (250μl per 5 ml of culture) and mix it.
3. Add 250μl of S2 buffer to 2, then mix very gently and quickly.
4. Add 350μl of S3 buffer to 4 and mix them quickly. Centrifugate the solution (13500g, 10min)
.5. Put the supernatant in the column and place it in the Eppendorf tube and centrifugate it (13500g, 1min).
6. Discard the filtrate, add 300μl of the AW buffer to the column, and perform centrifugation (13500g, 1min).
7. Discard the filtrate, add 500μl of the PW buffer to the column, and perform centrifugation (13500g, 1min).
8. Throw away the filtrate and perform centrifugation again (13500g, 1min).
9. Replace the Eppendorf tube, add EB to the column as much as desired (50~100μl), wait for one minute and centrifugate it (13500g, 1min).
10. Discard the column and take a filtrate.
11. Check the results with electrophoresis.
PCR
Materials
DNA template, primer(F/R), DNA pol., DNA pol. Buffer, pure water, PCR tube, thermocycler, micropipette
Method
1. Mix ingredients in a PCR tube in appropriate proportion. DNA polymerase is the last to be mixed.
*for pfu pol.; DW: 10x buffer: primer F: primer R: 10mM dNTP : template : pfu = 39 : 5 : 1 : 1 : 1 : 1 : 2 (total 50)
*for Q5 pol.; DW: 5x buffer: Primer F: Primer R: 10mM dNTP : template : Q5 = 29.5 : 10 : 2.5 : 2.5 : 4 : 1 : 0.5 (total 50)
2. After placing the tube on the thermocycler, repeat the cycle (denaturation-binding-annealing) as desired and react to the temperature conditions according to the primer.
3. Check the result with electrophoresis.
*Colony PCR is the same method except that the ‘liquid medium’ is used instead of the ‘template’.
PCR Product Cleanup (Using MG MED Kit)
Materials
sample DNA, buffers(PB, NW, EB), Eppendorf tube, column
Method
1. Mix a PB buffer equal to five times the amount of DNA.
2. Put the column in the Eppendorf tube and put 1 in the column.
3. Perform centrifugation (13500g, 1min) and remove the filtrate.
4. Add the NW buffer of 700μl to 3, and perform centrifugation (13500g, 1min).
5. Remove the filtrate of 4 and centrifugate it one more time (13500g, 1min).
6. Replace the Eppendorf tube, add EB to the column as much as desired (50 to 100μl), wait for one minute and centrifugate (13500g, 1min).
7. Discard the column and take a filtrate.
Vector Restriction Enzyme Cut
Materials
vector, restriction enzyme, enzyme buffer
Method
1. Mix vector and enzyme buffer.
2. Add the restriction enzyme to 1 and wait at room temperature for 10 minutes.
3. Check the results with electrophoresis.
LIC
Materials
T4 DNA pol. and buffer, insert DNA, vector, pure water, competent cell
Method
1. Mix T4 DNA pol. buffer, insert DNA, vector, and pure water in proportion and keep them cold.
2. Add T4 DNA pol. to 1 and then react 2.5min at room temperature and quickly put it into ice.
3. Perform transformation by mixing the solution of 2 and the component cell, and then incubate it in a suitable medium plate.
Overexpression (IPTG induction)
Materials
media, IPTG(1M), micropipette
Method
1. Cultivate the desired microorganisms and measure the OD600 value frequently.
2. When OD600=0.8 is reached, stop incubation and add IPTG (0.1 mM - 1 mM).
3. Culture by shaking incubation at 4°C for 12 hours.
SDS-PAGE
Materials
protein sample, PAGE gel, loading buffer, running buffer, staining/washing buffer, PAGE kit, power supply, micropipette
Method
1. Assemble the gel to the kit and pour the running buffer.
2. Mix the protein sample with the loading buffer.
3. Load 2 into 1 gel well and run for 50 minutes.
4. Take out the gel from kit and observe the results after staining (1 hour) and washing