

Overview
Throughout the cloning process for our respective subprojects, our team focused on designing constructs that could be modularly used for future experiments. For example, for DiCE in vitro and in vivo DNA designs we included restriction enzyme cut sites so future users could swap out the target protein and easily adapt our system for their own novel DiCE applications. Furthermore, the cloning work for both the PREDCEL+
DiCE in vivo
During the beginning stages of our team’s project, we branched out our resources and designed several wet-lab and technical projects simultaneously to allot ourselves options. In these early stages, an initial construct design for Qβ was used for proof-of-concept work on the functionality of the beta subunit of Qβ replicase within our host organism, Escherichia Coli. Upon finding initially promising results, our group convened and chose to keep Qβ. In order to prove our hypotheses, we required, however, to optimize our construct design and implementation strategy to appease our goals and allow for a concrete proof-of-concept of directed evolution.
- Initial construct design
In the very early stages of the DiCE leg of the project, the design of the initial vector plasmid was created. Our initial desire was to create a schema to test for the evolutionary capabilities of Qβ in vivo, on a target gene of an antibiotic selection marker. To do so, the intended construct desired extensive cloning. The steps taken to successfully clone the construct are outlined below:
Step 1: A pET28a+ vector was ordered from New England Biolabs (NEB), while our part inserts Qβ replicase and MDV were ordered from Integrated DNA Technologies (IDT).
Step 2: The pET28a+ vector was opened up between the T7 promoter and terminator region using a high-fidelity Q5 Polymerase. The linearized vector was then cloned using Gibson Assembly to have an MDV fragment insert.
Step 3: The cloned vector was then reopened as before in the middle of the MDV region to create MDV-1 and MDV-2 flanking regions, allowing for a gene(s) of choice to be replicated by Qβ by acting as recognition sites on the mRNA.6, 7 One of these genes being that which encodes Qβ replicase itself, which was ligated into the vector via Gibson Assembly.
Step 4: For a third time, Gibson Assembly cloning was used to insert a chloramphenicol resistance gene, whose DNA fragment was PCRed from an in-house construct supplied by our host student group, BIOME.

Step 5: Our construct was, after each cycle of cloning, grown and selected for on kanamycin plates. After the final round of cloning and antibiotic selection, picked colonies were grown in kanamycin, mini-prepped, and then sequence-verified at our local sequencing facility: PAN.
- Optimized Design
In order to refine the original design to better match our ultimate goals, the vector plasmid design was refined to account for concerns with the dynamics and mutagenesis kinetics of the mechanism. Early questions and critics of the original system raised by advisors, interviewees, and ourselves included: how are we to account for the mutagenesis of the Qβ protein itself (Qβ replicase was originally expressed in the mutagenized mRNA)? How might the exponential proliferation of protein account for resistance rather than an optimized protein? And how might the exponential kinetics of the system impact the longevity of the cells? We tackled these problems among others with creating the constructs outlined below:
Step 1: Using the original pRNA construct as the template plasmid vector, the high fidelity Q5 polymerase was utilized to linearize backbones for both Qβ and No Qβ constructs. The former’s backbone was PCRed with Gibson overhangs from the T7 promoter and terminator in opposing directions. The latter, was PCRed similarly, except with the addition to include the MDV-1 and MDV-2 regions.

Our 2019 iGEM team, with three high school interns front and center :) Step 2:The Qβ fragment was also PCRed with Gibson overhangs from the original pRNA construct to prepare for Gibson Assembly. Other genes, such as chloramphenicol and ampicillin resistance markers (CMR and AmpR respectively), intended to undergo mutagenesis for proof-of-concept experimentation underwent additional preparatory steps. Another caveat is that when PCR-ing these particular DNA fragments, the Gibson overhangs were designed such that the gene would be ligated into the vector backbone in a reverse complimentary orientation. This would allow us the ability to definitively prove Qβ’s replicative functionality through protein synthesis of antisense mRNA, which can not be created by typical RNA polymerases found in E. coli.
Step 3: Target genes would not only be utilized as is within the DiCE system but as a proof-of-concept for the mutagenic capabilities of Qβ, single nucleotide polymorphisms (SNPs) were introduced to the genes (e.g. CMR and AmpR) using the Quick Change Mutagenesis Kit.
Step 4: Fragments were then ligated into their respective backbones using Gibson Assembly.
Step 5: No Qβ as a plasmid is not pragmatically useful as the vector backbone is the same as that of Qβ’s. Rather, this construct serves to propagate a target gene in its original form for practical reasons. This gene within the MDV flanks is then selectively amplified in vitro, using a T7 High-Scribe Kit to prep for transfection and subsequent evolution. In other words, the mRNA itself, serves as the applied construct.

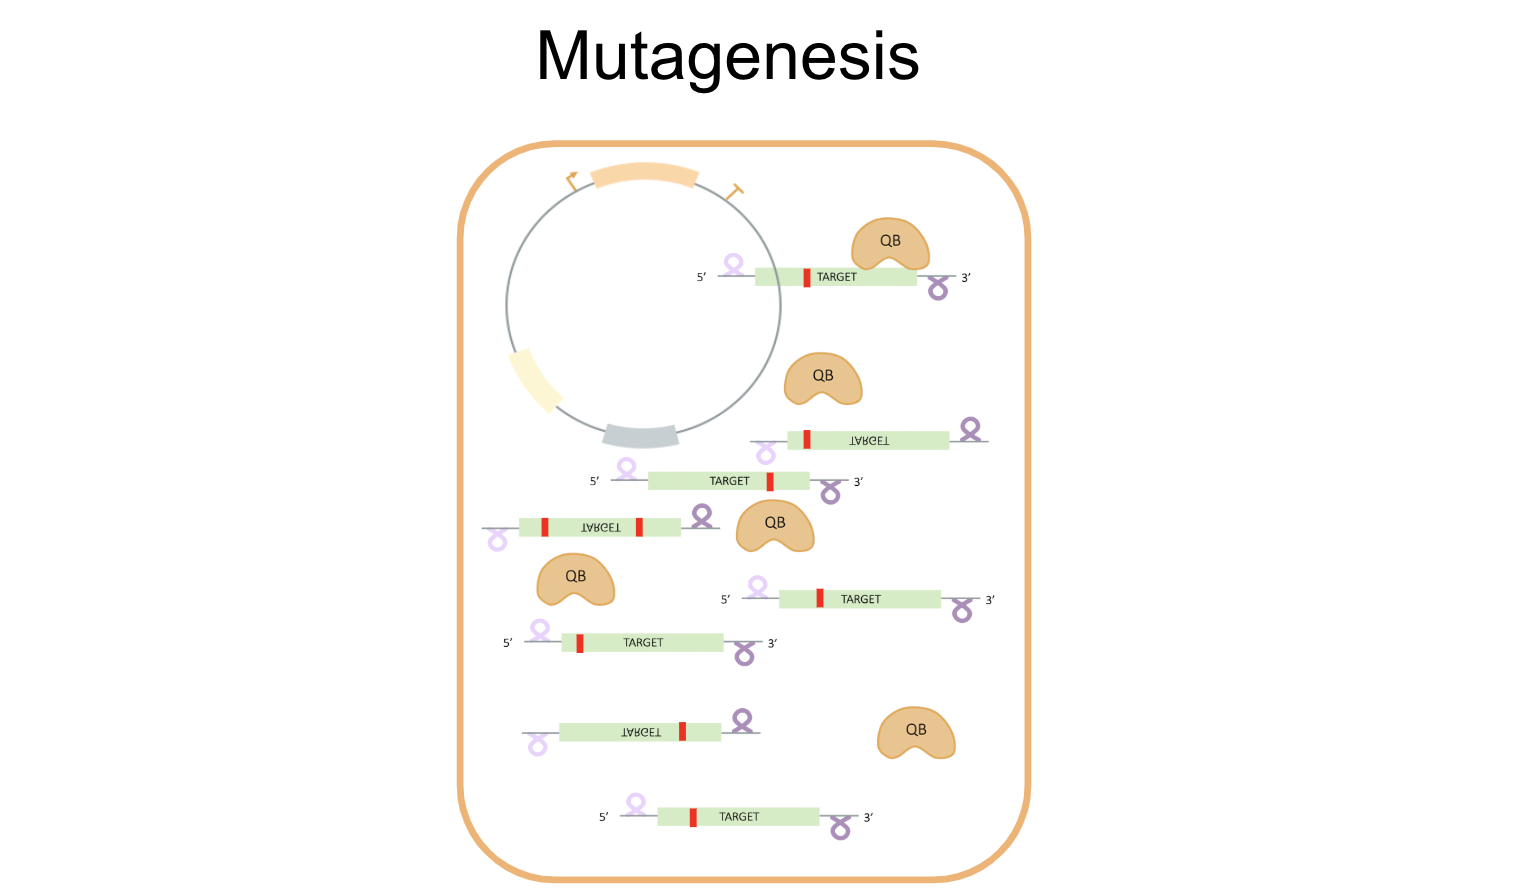
- Mechanism
Working towards our goal of developing a successful in vivo directed evolution system using Qβ replicase, we attempted to optimize initial constructs to create a streamlined process for set-up, mutagenesis, and selection. The envisioned process is depicted below:


DiCE in vitro
We envision a workflow where researchers can create selection schema using PCR-amplified linear DNA fragments that link desired behavior to Qß synthesis. The ability to deploy PCR products directly into the directed evolution workflow will allow greatly improved and faster rapid prototyping, as well as dramatically expand accessibility to directed evolution techniques. Within the directed evolution process, the individual mutants are compartmentalized in individual water-in-oil droplets, creating the genotype to phenotype linkage necessary for selection-based directed evolution, ensuring the same self selective power as cellular directed evolution technique analogs.
When creating our constructs, we developed them via PCR amplification directly off our plasmid backbone, generating linear DNA fragments that were transcribed into RNA with the T7 HiScribe Quick Transcription kit, and then directly input into reactions.
Program Outreach
A common pitfall of outreach is to selectively reach out to those who are already well-connected to such opportunities. For our team, being situated in the Bay Area made this all the more pertinent: it would be all too easy to get ample applicants by simply contacting one or two private high schools with already well-established internship programs. We wanted to reach beyond this, however. Thus, we made it our goal to spread the word to people who may not otherwise have the opportunity to get engaged with lab research.

- Had each Stanford iGEM member contact 2-3 local biology teachers from a variety of high schools.
- Had a departmental-wide announcement to graduate students advertising the program and encouraging them to forward our program information widely.
- Did in-person outreach to spread the word to local high school students.
We put together and distributed the following informational packet to these different outlets. Note that this is a version prior to the expansion of the program to include minors: https://tinyurl.com/Stanford-iGEM2019-18program
More recently, we improved the cover page to the following (see right). An editable version of this template can be downloaded here for teams interested in building upon this handout to use for their teams

Application Process
The goal of the application process was to identify candidates that have demonstrated interest in pursuing science beyond the classroom and that would be committed to the team for the duration of their internships. We emphasized that prior lab experience was not required or expected, and we encourage applicants to highlight other skills and experiences outside of the classroom that may have given them applicable skills to working with a team on a long-term project.
We designed an application process with two phases: a written application with a letter of recommendation from a teacher or mentor, followed by a face-to-face interview with two to three members of the iGEM team.
For the application we asked for a one-page cover letter addressing the following four questions:
- Why would you like to work on the Stanford iGEM team this summer?
- What level of commitment can you have this summer?
- What prior experiences have you had that may be relevant to your experience this summer?
- How have your prior experiences uniquely prepared you to contribute to iGEM?
They could submit this cover letter along with basic information at this google form. As an additional resource, here are email templates that our team used throughout the process. Although teams may need to modify these documents to to tailor them for their respective programs, we encourage teams to use them as starting points for their program and to reach out to us if they have any questions.
Gaining Departmental Support
Having minors work supervised exclusively by undergraduates in a lab with a variety of safety hazards creates significant liability. Thus, getting support for a program such as this is inherently political and can be a time-intensive and bureaucratic process—get started well-before summer to leave time for outreach and a substantive application process!
Our first recommendation is to reach out to immediate mentors that know the larger system within which your iGEM team is operating. For us, this was the teaching lab’s Lab Manager. She knew what entity would ultimately need to approve such a program (the BioE Department Chair), she had recommendations for putting together a proposal, she knew some of the safety training requirements and pointed us to resources for minor-specific requirements, and finally she could connect us to the intermediate faculty from which we would need to garner support before proceeding to the department chair.
Our final proposal was a modified version of the aforementioned informational handout, but with an additional letter of support from our lab manager.

My final more personal recommendation here is to balance being both professional and personal as you build relationships with those across the department. Though it may at times seem like a bureaucratic web of rules, building mutual trust with all those you come across can go much further than you may expect.
Safety
Safety was at the forefront, tail-end, and just about every step of the internship program. Before entering lab we had a comprehensive list of required safety trainings and documentation to complete, as well as a detailed list of requirements while working in lab.
In addition to the usual lab safety standards, working with minors poses a few additional hurdles. While these are unique for each university, beyond parental consent and liability forms from parental guardians Stanford also required that all of the undergraduates on our team completed additional “Working with Minors” online trainings, got official background checks, and were fingerprinted.
In addition to the safety checklist, we documented the expected types of lab work in which high school students may participate, and also outlined off-limit work (such as tissue culture and chemical room access). For all time in lab, we ensured high school students would always be paired with at least one undergraduate at all times.

Mentorship Structure
We approached the mentorship structure with intention: we aimed to create a program that efficiently used both undergraduate and high school students’ time, that would expose interns to a variety of types of work, and that would allow interns to take ownership over part of the project.
We encouraged interns to commit to 6-8 weeks (four week minimum), working in lab 4 hours per day Monday to Friday. Our team quickly realized that it was most effective to have the mornings reserved for the undergrads to do logistical work, long-term project planning, and initial lab work, then to have the interns join us in lab at 1:00PM for the remainder of the day.
We set aside the first 2 weeks for interns to shadow a variety of the sub-projects our team were working on in order to maximize exposure to different lab techniques. We put together a document with descriptions and links to protocols for common lab techniques (including basic instructions for using Benchling), and had interns print and annotate the procedures.

Following this initial phase, we then decided the interns were ready to take on their own sub-project: AcrIIA4 Directed Evolution. With assistance when needed, we let them design primers, submit sequencing data, and ultimately plan their own lab work timeline.
For the final phase we helped the interns write up the content of their sub-project for the website (check out “AcrIIA4 Evolution”!). While recognizing that research is never complete, this final push was critical for pulling together the work they had completed thus far, for recognizing and contextualizing the motivations for the work they were doing, and for ultimately sharing their findings with the larger scientific community.
Gathering and Implementing Program Feedback
From the get-go, we were up front with the interns that the program was a novel one. We highly encouraged open communication and constructive feedback on both positive and negative aspects of the experience so that we could continue to improve.
To further encourage and formalize this process, we had interns fill out an anonymous satisfaction and feedback survey both midway and at the end of the program. We included an input field for a random number the intern could put so we could track performance longitudinally while still maintaining anonymity. We tracked some metrics quantitatively such as overall satisfaction and whether the interns felt their time was being used effectively, and we also gave space for more qualitative feedback such as “What aspects of the program would you like continued” and “Please provide 1 to 3 areas where we could improve to maximize your experience this summer.”
These survey results both helped us to make tweaks to the program midway through the summer, and it also gave us concrete areas to work on for next year (see data below!).

Closing Out the Program
Though it may seem a small detail, we’re strong advocates of a fun last day :) On one of the last days of summer, we invited the three interns back for one last celebration of all the hard work we completed over the summer. We put together personalized certificates of completion for the high schoolers, we got some ice cream, and had a relaxing afternoon enjoying a picnic out on the oval.


